Pages

Thursday, November 29, 2012

Christmas Countdown or Advent Calendar

Are you super excited to celebrate each moment of this Holiday season? 


I know I am! 


Over at Practical Scrappers today I shared this idea for creating a Christmas Countdown Calendar and I wanted to share it here too!


As a child, everyday in December, I looked forward to opening the door on our Advent calendar to see what fun representation of the holiday season would present itself!  I wanted to create a calendar that my kids can open each day and that I can change out what is behind the doors for next year.  This is what I came up with: 


I used acrylic squares that were intended for an album and used my heavy duty Crop-A-Dile and punched holes so that I could place brads through the acrylic to hold both the front "door" and the back holiday item in place.  To create the snowlike numbers I used white paint on my stamp, immediately after stamping the number, I poured iridescent glitter over it.  When the paint dried, I simply shook off the excess glitter.  Each door got a little "snowy" edging with white paint too.  


Here are just a couple of examples of the goodies behind each door. 


You can use whatever holiday embellishments you happen to have.  I used a wide range of items including brads, stickers, letters, chipboard, 3-d embellies and rub-ons. Symbols of the season.     
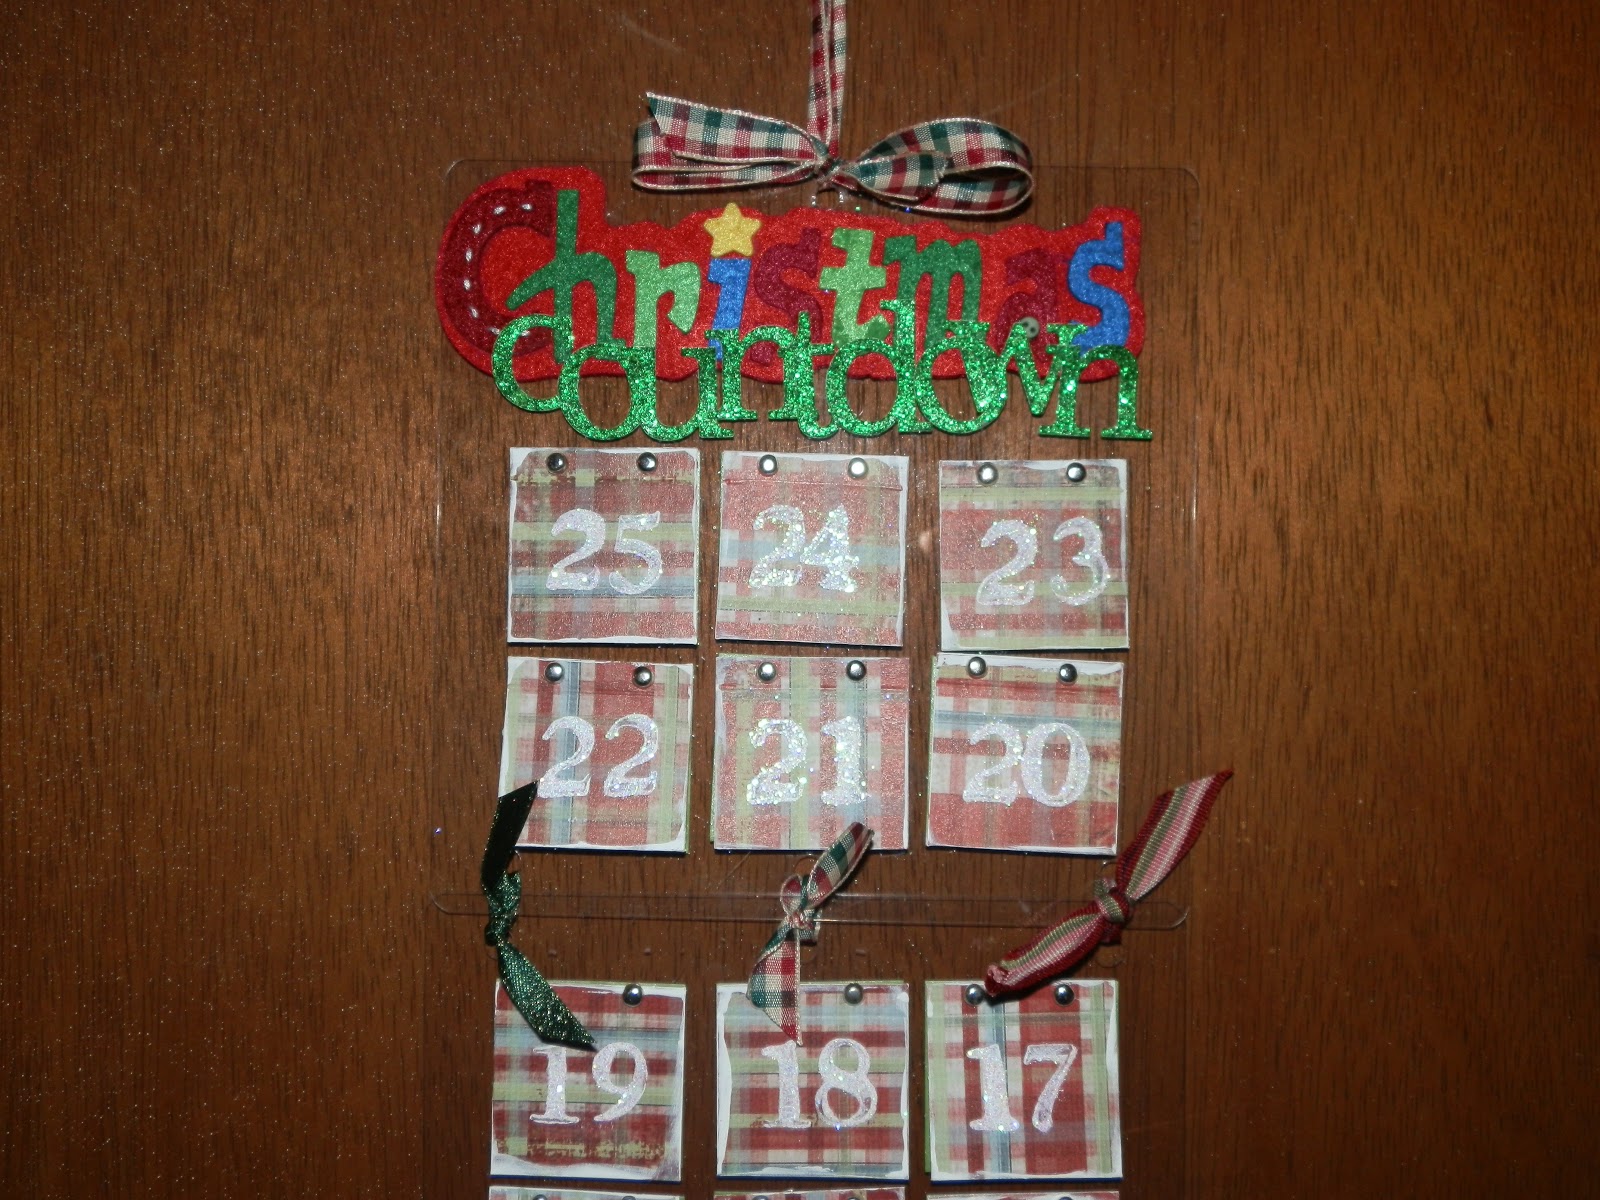


I created a title with a pre-made Christmas title and green glitter letters.  


The last day on my countdown does not have a number but a gift that says "Do Not Open Until Christmas"


Hiding behind that gift is Santa and his sleigh and a message that says "Happy Birthday Jesus." 


  Next year, I just need to open the brads and replace the items on the back with fun, new holiday goodies! 


I hope this inspires you to create a calendar to countdown this magical season! 


Happy Holidays to all of our readers! 

Wednesday, October 31, 2012

So Thankful Wreath

Happy November Everyone!! 


 I am so excited to share a new tradition I hope to carry on in our family.  


We made a "Thankful Wreath" to remind us each day of this season of all of the good things we have and that we have so much to be thankful for.  


I started with a straw wreath I picked up at our local Creative reuse store and I wound a brown floral ribbon around it and tied a bow.  


I used my Slice machine to die cut a variety of leaves out of fall colored papers. 


Next, I used rub-ons, stamps, pens and stickers to add the things we are thankful for to the leaves.


I embossed some veins on the back side of the leaves to create a little bit of texture and make them look a little more life-like.   


I used straight pins to place the leaves around the wreath.  Some leaves got one pin, some got two, one in each end to give them a bit of dimension.  


This time of year it is so easy to get caught up in all that has to get done and all the things the little ones wish for.  It is a good time to step back and remind ourselves what we have already been blessed with.  


I intended to hang the wreath on the front door.  I changed my mind quickly though, when I realized we would see it better and more often if I hung it in the kitchen. 


Each time I look at it I am reminded that we have so much and although it does not always seem like enough, it is more than many others have.  


We are truly blessed and I hope that you are too! 


Happy November!


Happy Fall!


Happy Thanksgiving!


Monday, October 29, 2012

More Curly-Q Ribbon Inspiration


A while back I gave you a tutorial for how to create permanently curly ribbon.  I wanted to share some more ways I used this great new discovery for invitations that I made for my niece's birthday parties!


Lalaloopsy was perfect for this technique!!  I just love how adorable she came out!


I also used this technique for these super cute Minnie Mouse invitations


Love this idea and want to order you own?  Check them out in my ETSY store


Sunday, October 28, 2012

Getting Caught Up!

It is amazing how life gets out of control sometimes and things have to go by the wayside for a bit until I can catch my breath.  With 3 little school goers in my house and one too little for school yet, it has been super crazy in our house! My blog has been sadly behind because of this!  These days I am lucky to get a shower, let alone time to sit at the computer to post!  I am sorry for that but my family has and always will come first!  They have to!


That being said, here is a super cute birthday card I made and shared over on Practical Scrappers a few weeks ago along with other banner and garland projects:


It is super simple and easy.  I used a coordinated paper set that took all of the guesswork out of the color choices.  Sometimes this is a great idea if you are feeling unsure about a great color combo, or if you need to get things done quickly. Most of the time I like coming up with my own color scheme but when time is short, this is a super easy way to take some time out of the creating process!


There are some other great ideas over on the design team site that are definitely worth checking out!


Code for DT button

Friday, October 26, 2012

So Brave Layout! Glitter Pop Dots!

We looked at different ways to use Dimensional adhesive over at Practical Scrappers and some of the ladies had some super innovative ideas!


My idea was to Make them Shine!


I took dimensional foam adhesive dots and peeled off one side of the paper.  I shook some glitter onto them and pressed it on with my finger a bit.  I then shook off the excess, and peeled the backing paper and placed it on my layout to create photo corners and to accent the letters in the title.


It helped to make the photo pop and the letters stand out too!!


Check out the other designer's ideas at Practical Scrappers!

Some Fall Inspiration

Fall is here!


 I am so excited to see the changing leaves and not so excited about having to rake them up every day or so!!  This is our first year really experiencing fall with our kids since we moved from Florida where the change of seasons was minimal.  THEY LOVE it!! They love to play in the leaves and rake them back into a pile, and jumk in them again.  The littlest just stands there and laughs her little heart out when her sisters toss leaves on her head! It is truly wonderful to see!


I just wanted to share quick layout that is my favorite fall layout so far!  I hope to have some great new ones coming from our leaf pile photo shoots!  Get outside and take some pictures!  It is a great time of year to be outside enjoying the world around you and the pictures will be so fun to scrap!!

Wednesday, September 12, 2012

Send a Little Love


Hi Everyone!! I wanted to share my take on what I think is an amazingly inspiring idea that was introduced by Stacy Julian over at 
Big Picture Classes during the first day of their Big Idea Festival.


Happymail! 


The idea is to brighten someone's day.  Her challenge is to take the time to sit down and write (with a pen and paper, I know crazy right?) a card or a letter to someone in your life. Doesn't have to be long or mushy, just something to let that person know you are thinking of them and wish them well.  


I was immediately touched by this idea.  It is so true that when we go to the mailbox, most of the time we get catalogs or dreaded bills...How nice to find something in the mailbox that is meant to brighten your day!  It can take whatever kind of day you are having and kick it up a notch or two.  It will put a smile on that person's face for sure.  


I decided to make a card and write a letter to my Mom.  She is an amazing woman and she does not get recognized enough for the sacrifices she makes everyday.  I recently moved away from her with my family and I miss her everyday so I thought that was perfect!  


 Part of the challenge is to encourage the person you write to to Pay it Forward. I made my card with a pocket on the inside to slip my letter into so that if my Mom was unable to find the time to make a card, she could reuse the one I made and slip a letter into the pocket for her recipient.  


This is what the final page of my letter said:


 It seems that this card is only the beginning of this for me though.  As I was making my Mom's card, I was inspired to create on for my Grandmother, who I do not see or speak to enough:


As I created her card, I came up with a list in my head of all the other people in my life whose days I would like to brighten.  Sisters, friends, teachers... Maybe one a day for a month...2 months...a year...I will do my best to brighten the days of everyone I am lucky enough to have in my life.  


So, take a few minutes and write a note to someone in your life.  Seal it, Stamp it, and send it along. You just might find this simple idea does not just brighten another's day, but that is brightens your day as well.